The ASF secret sauce for Facebook ads, how to implement it on your page and a detailed video tutorial on how to get started today.
Over the last few weeks we have been talking quite a bit about Facebook here on the blog.
It goes without saying we are quite bullish on Facebook for a number of reasons.
Chiefly, the majority of our customers (and pretty much all artists and art businesses out there for that matter) are in need of more solid traffic sources that they can leverage.
We believe that in this, the year of our lord 2015, that Facebook represents the easiest way to do that. The Hiscox report confirms it and the feedback from customers who are on our platform and are successfully leveraging Facebook backs it up further.
We love instagram and we can’t wait to cover it in future posts, but we believe Facebook is the easiest and most effective platform out there currently to get your art in front of the most eye balls possible.
When we look at our internal analytics reports and email open rates – both of which support the fact that posts about Facebook here on the blog, and in the private forum, are some of the most popular content we put out.
So we know you guys are asking for more on Facebook, and we aim to deliver.
If you have visited our website, then we can show you ads (re-marketing), or if you have signed up for one of our email lists (email) then we can also show you ads.
In other words, if you’ve interacted with us in any way and are on Facebook (read: the whole world/your future customers are), then you are going to see our posts.
You’ll see them this week, next week, next month…you get the idea.
That every-day exposure means our brand, content, and message is going to stay top of mind for you.
Even if you don’t click on the ads, you are going to know we are doing some amazing things here at ASF and perhaps when it’s time for you to get a fully featured eCommerce solution tailored to artists, art galleries, and print studios you will give us a look.
And that’s our goal.
Acquiring customers now and in the future is likely your goal too.
A difference between us is that you’re selling art, which is way cooler than eCommerce software. Don’t get me wrong, I love our product and what we do, but let’s face it – looking at art on Facebook is just WAY COOLER than looking at software.
Which means your ads will likely be even more effective in terms of likes and shares then ours are.
We practice what we preach here at ASF. We are not recommending this strategy because we read somewhere it works and think you should try it. We are running it ourselves and it’s working great for us and it will work great for you too.
The recipe is simple: you author regular posts on Facebook, you turn them into ads, you show these ads to remarketing + email audiences (people that have interacted with your brand).
That’s the secret sauce and its important to understand the key distinction. Regular posts shown to folks that have interacted with your brand before.
Its where you need to start. If your ads prove effective to warm traffic then you can move on to cold traffic.
Baby steps are the key.
That’s it, and once you learn the process its quite easy to do.
So lets get into it.
What will follow is the exact recipe we use here at ASF. Your needs might be slightly different. Say if you are offering services and that’s the only type of Facebook posts you author. We will cover some strategies to use in the future if that’s your situation.
If you are an artist and post your art or any type of content then this strategy will work great for you.
Hello guys,
Patrick from Art Storefronts here, and in this screencast we are going to be going over the exact advertising strategy that we use to advertise our latest content posts on Art Storefronts.
Alright, so let’s get right into it. I’m gonna click this upper right hand corner here, I’m going to go to “Manage Ads,” and this’ll take us to the default Ads Manager in Facebook.
Then we’re gonna go up here and we’re gonna click “Power Editor,” which will open in a new tab.
Okay.
We’re going to go ahead and go “Download to Power Editor” – you might not have anything here, because this is the first Ads you’re running, but either way just click “Download.”
Alright, immediately I’m going to go to “Create Campaign” – I’m gonna call the campaign “Recent Content Posts” – you can call it whatever you like.
“Bidding Type” we’re going to set to “Auction,” for “Objective” we’re going to go ahead and set for “Page Post Engagement,” that’s really critical.
Alright, let’s choose an Ad Set. So I’m gonna create a new Ad Set and I’m going to call it “Recent Posts,” and we’re gonna do “Email List + Remarketing.” Okay. And let’s go ahead and go “Create.”
Now, it’s set. You can see it’s popped up these little new things here, we’re not gonna worry about that, we’re gonna go ahead and click “Ad Sets.”
So, I’m going to go to the Ad Set that we just created, which was “Recent Posts + Email List,” it’s gonna open that up, let’s click back here to “Ad Sets.”
The power editor, which is this feature that we’re using here now, is a little bit janky, you’re just gonna have to roll with it. I’m gonna go ahead and click this pencil icon over here, and the first thing we have here is the daily budget.
We set ours to ten dollars, I recommend you set yours to ten dollars, too. If you’re not comfortable doing ten dollars, do one dollar, do five dollars, just get started which is the key, right?
“Schedule,” don’t worry about that. For the “Audience,” let’s go ahead and edit the audience. This is, this is key.
So, we’re gonna go – let’s close the tool tip – we’re gonna go to “Custom Audiences,” and we’re gonna go ahead and go “Browse.” Now, if you followed our blog posts, you should have two audiences in here – you should have your email database, and you should have your remarketing pixel audience, so I’m gonna select both of those.
Our email database on this account is called “Chimp Database,” so let’s add that. It’s added. I’m gonna go ahead and add our “WCA All Visitors,” which is our remarketing audience.
Okay. So, you can now see we’ve got our customer list, our Chimp database, and our website visitors – all visitors. That’s it, that’s all you have to worry about. Let’s go ahead and click “Save.”
“Save,” done, great.
Now, let’s go ahead and click this little icon here, so we’ve got “Campaign,” “Ad Sets,” Ads,” right?
Now we’re gonna go ahead and create an ad, so let’s “Create an Ad” – we’re gonna use our existing campaign, “Recent Content Posts,” we’re gonna choose an Ad Set, which is “Recent Posts Email Remarketing,” great, let’s name an ad.
Now, on this account, I’m using this pet account just to keep things simple because the Art Storefronts account has a lot of stuff in it that might be confusing. So, for the recent ad name, I’m gonna go ahead and call this one – what am I gonna call it, because i know the post, I’m gonna call it… “Frenchie Bull Dog.” Great, and I’m gonna go ahead and click “Create.”
So what you want to name it, is you want to name it whatever your most recent content post is. So, for me in this pet account, it’s a french bull dog post, I already know that so i’m gonna go ahead choose it.
“Skout’s Honor” is the name of this particular page, and you can say “Create Ad” – I’m gonna use my existing post. So here it is. For you, this will just load up all your most recent posts that you’ve made.
So I’m gonna go ahead and click this one – there it is, there’s the French bull dog. And you see down here, there’s tracking.
Now, if you’ve followed our Facebook posts, you’ve created a checkout pixel. We’re gonna go ahead and use that just so we can measure it. So I’m gonna go ahead and “Use existing post,” in this case it says “Shopify Checkout,” for you it will likely say “ASF Checkout,” or whatever the name you used it.
So let’s go ahead and select that. Okay. Don’t worry about what that says there, it says we need to verify it – it’s not the case.
And that’s it, your ad is done. So this is the most recent post that has been authored on this particular Facebook page. For you it might be your art – a recent piece of art that you’ve created. And that’s it. You go up here and you click “Upload Changes.”
Click “Continue.” Up it goes, it’s doing its thing, it’s doing its thing…click “Done.”
So, what that’s now done, is it sent this ad into Facebook, and it’s gonna be a little while until it approves it. You’ll get an email once it does approve it, and then ocne it’s aprpoved, it will be running. So it’s quite literaHello guys,
Patrick from Art Storefronts here, and in this screencast we are going to be going over the exact advertising strategy that we use to advertise our latest content posts on Art Storefronts.
Alright, so let’s get right into it. I’m gonna click this upper right hand corner here, I’m going to go to “Manage Ads,” and this’ll take us to the default Ads Manager in Facebook.
Then we’re gonna go up here and we’re gonna click “Power Editor,” which will open in a new tab.
Okay.
We’re going to go ahead and go “Download to Power Editor” – you might not have anything here, because this is the first Ads you’re running, but either way just click “Download.”
Alright, immediately I’m going to go to “Create Campaign” – I’m gonna call the campaign “Recent Content Posts” – you can call it whatever you like.
“Bidding Type” we’re going to set to “Auction,” for “Objective” we’re going to go ahead and set for “Page Post Engagement,” that’s really critical.
Alright, let’s choose an Ad Set. So I’m gonna create a new Ad Set and I’m going to call it “Recent Posts,” and we’re gonna do “Email List + Remarketing.” Okay. And let’s go ahead and go “Create.”
Now, it’s set. You can see it’s popped up these little new things here, we’re not gonna worry about that, we’re gonna go ahead and click “Ad Sets.”
So, I’m going to go to the Ad Set that we just created, which was “Recent Posts + Email List,” it’s gonna open that up, let’s click back here to “Ad Sets.”
The power editor, which is this feature that we’re using here now, is a little bit janky, you’re just gonna have to roll with it. I’m gonna go ahead and click this pencil icon over here, and the first thing we have here is the daily budget.
We set ours to ten dollars, I recommend you set yours to ten dollars, too. If you’re not comfortable doing ten dollars, do one dollar, do five dollars, just get started which is the key, right?
“Schedule,” don’t worry about that. For the “Audience,” let’s go ahead and edit the audience. This is, this is key.
So, we’re gonna go – let’s close the tool tip – we’re gonna go to “Custom Audiences,” and we’re gonna go ahead and go “Browse.” Now, if you followed our blog posts, you should have two audiences in here – you should have your email database, and you should have your remarketing pixel audience, so I’m gonna select both of those.
Our email database on this account is called “Chimp Database,” so let’s add that. It’s added. I’m gonna go ahead and add our “WCA All Visitors,” which is our remarketing audience.
Okay. So, you can now see we’ve got our customer list, our Chimp database, and our website visitors – all visitors. That’s it, that’s all you have to worry about. Let’s go ahead and click “Save.”
“Save,” done, great.
Now, let’s go ahead and click this little icon here, so we’ve got “Campaign,” “Ad Sets,” Ads,” right?
Now we’re gonna go ahead and create an ad, so let’s “Create an Ad” – we’re gonna use our existing campaign, “Recent Content Posts,” we’re gonna choose an Ad Set, which is “Recent Posts Email Remarketing,” great, let’s name an ad.
Now, on this account, I’m using this pet account just to keep things simple because the Art Storefronts account has a lot of stuff in it that might be confusing. So, for the recent ad name, I’m gonna go ahead and call this one – what am I gonna call it, because i know the post, I’m gonna call it… “Frenchie Bull Dog.” Great, and I’m gonna go ahead and click “Create.”
So what you want to name it, is you want to name it whatever your most recent content post is. So, for me in this pet account, it’s a french bull dog post, I already know that so i’m gonna go ahead choose it.
“Skout’s Honor” is the name of this particular page, and you can say “Create Ad” – I’m gonna use my existing post. So here it is. For you, this will just load up all your most recent posts that you’ve made.
So I’m gonna go ahead and click this one – there it is, there’s the French bull dog. And you see down here, there’s tracking.
Now, if you’ve followed our Facebook posts, you’ve created a checkout pixel. We’re gonna go ahead and use that just so we can measure it. So I’m gonna go ahead and “Use existing post,” in this case it says “Shopify Checkout,” for you it will likely say “ASF Checkout,” or whatever the name you used it.
So let’s go ahead and select that. Okay. Don’t worry about what that says there, it says we need to verify it – it’s not the case.
And that’s it, your ad is done. So this is the most recent post that has been authored on this particular Facebook page. For you it might be your art – a recent piece of art that you’ve created. And that’s it. You go up here and you click “Upload Changes.”
Click “Continue.” Up it goes, it’s doing its thing, it’s doing its thing…click “Done.”
So, what that’s now done, is it sent this ad into Facebook, and it’s gonna be a little while until it approves it. You’ll get an email once it does approve it, and then once it’s approved, it will be running. So it’s quite literally that simple. You now have your most recent post on ten dollars a day, or five dollars a day, whatever you said, shown to your remarketing audience plus your email audience, which is the absolute key for all of this.
It’s quite literally that simple. So let’s go ahead and stop the video here, and I’ll finish up with some follow-up in the blog post, okay?
Ok so you now know how we do things at ASF. Great. Whats next?
Here are my hopes with this post and video.
Lets split you guys into two camps. Still on the fence or ready to roll.

If you are on the fence about advertising on Facebook then I hope this gets you a step closer to doing so. Don’t worry we have plenty more content in the hopper that we are going to release on Facebook ads and how to run them successfully to make you even more comfortable in doing so.
If you feel you are ready to roll and want to give it a shot then what you have above are the exact steps you need to get rolling. If you are in this camp I want to follow up with just a few tiny further steps you need to be aware of.
In order for this to work you need to publishing new Facebook posts at least once a week. Lets set that at a minimum (its what we do on ASF currently – only our blog posts becomes ads). If you are doing more than once a week then thats even better.
As soon as you release a new post you author a new ad and turn the old ad off.
Frequency. This is key. What frequency means is the # of times your audiences have seen your ad. You need to pay attention to this number. If it gets above 3 then your audience will start to fatigue on your content (this is not good and annoying.)
So here is how you find frequency.
You get into your ads manager and you click down to the ad itself.
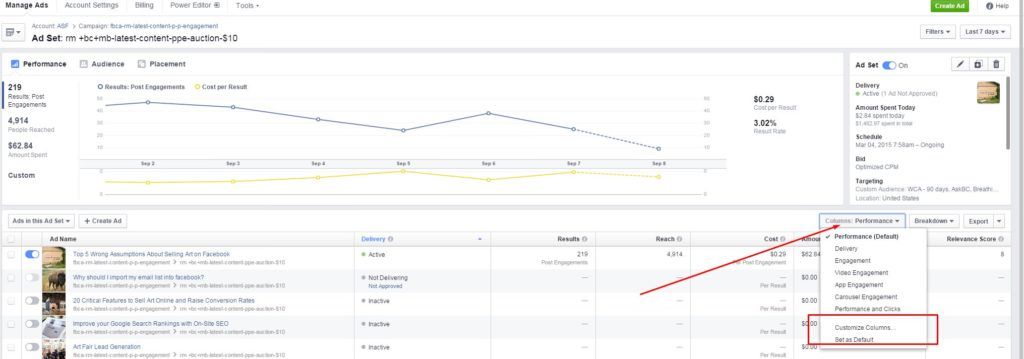
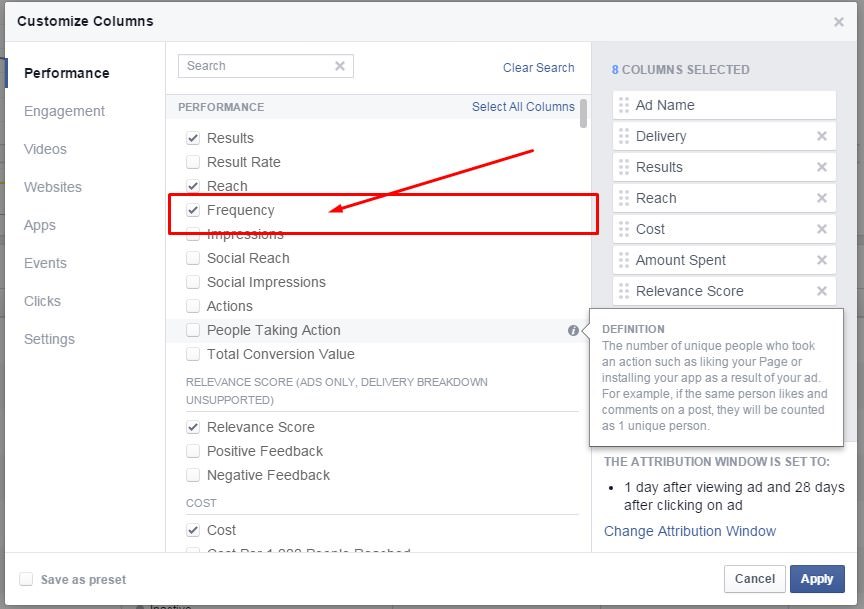
Once you do that locate the columns section and click on it and then click on customize columns.
Locate frequency and toggle it.
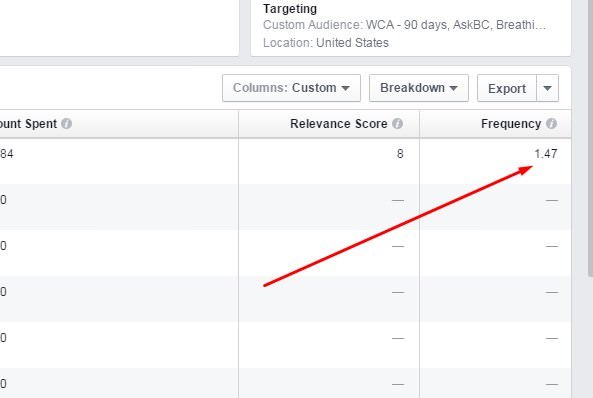
Now you will be able to see how many times your audience has seen this ad.
If this number gets higher than 3 then its time to shut the ad off (you can turn it on again in a few weeks though if needs be).
Yes, that’s it.
It really is that simple and that easy.
Are there several other complicated things about ads; bells and whistles and levers and such that are not covered in this post?
Absolutely. Some of which we use and didn’t cover.
That’s ok though. They are not necessary.
The whole point of this post is to keep things simple.
Your most recent content + ads to your remarketing & email audience (warm traffic).
With a minimal spend per month you can assure your latest content is always going to be on the top of mind to your loyal audience.
When it’s time to buy art they will be thinking about you.

