
PHOTOGRAPHING ART
How to Photograph Your Artwork for Reproduction (2025 Guide)
Everything a fine artist needs to have and know in order to effectively photograph their own artwork for print reproduction using a DSLR or camera phone.
Painters, illustrators, graphic designers, and fine artists of all kinds – before you can offer stunning prints of your work in a variety of sizes and media types, you'll need to have your work captured properly.
If budget is no issue, you can have this done professionally by a photographer.
If you'd like to attempt it yourself, it is doable, you'll just need a bit of equipment and the right techniques.
In this post, I'll lay out specific recommendations on equipment for photographing artwork, as well as a checklist for the basic process using lights and either a 24MP DSLR or a smart phone.
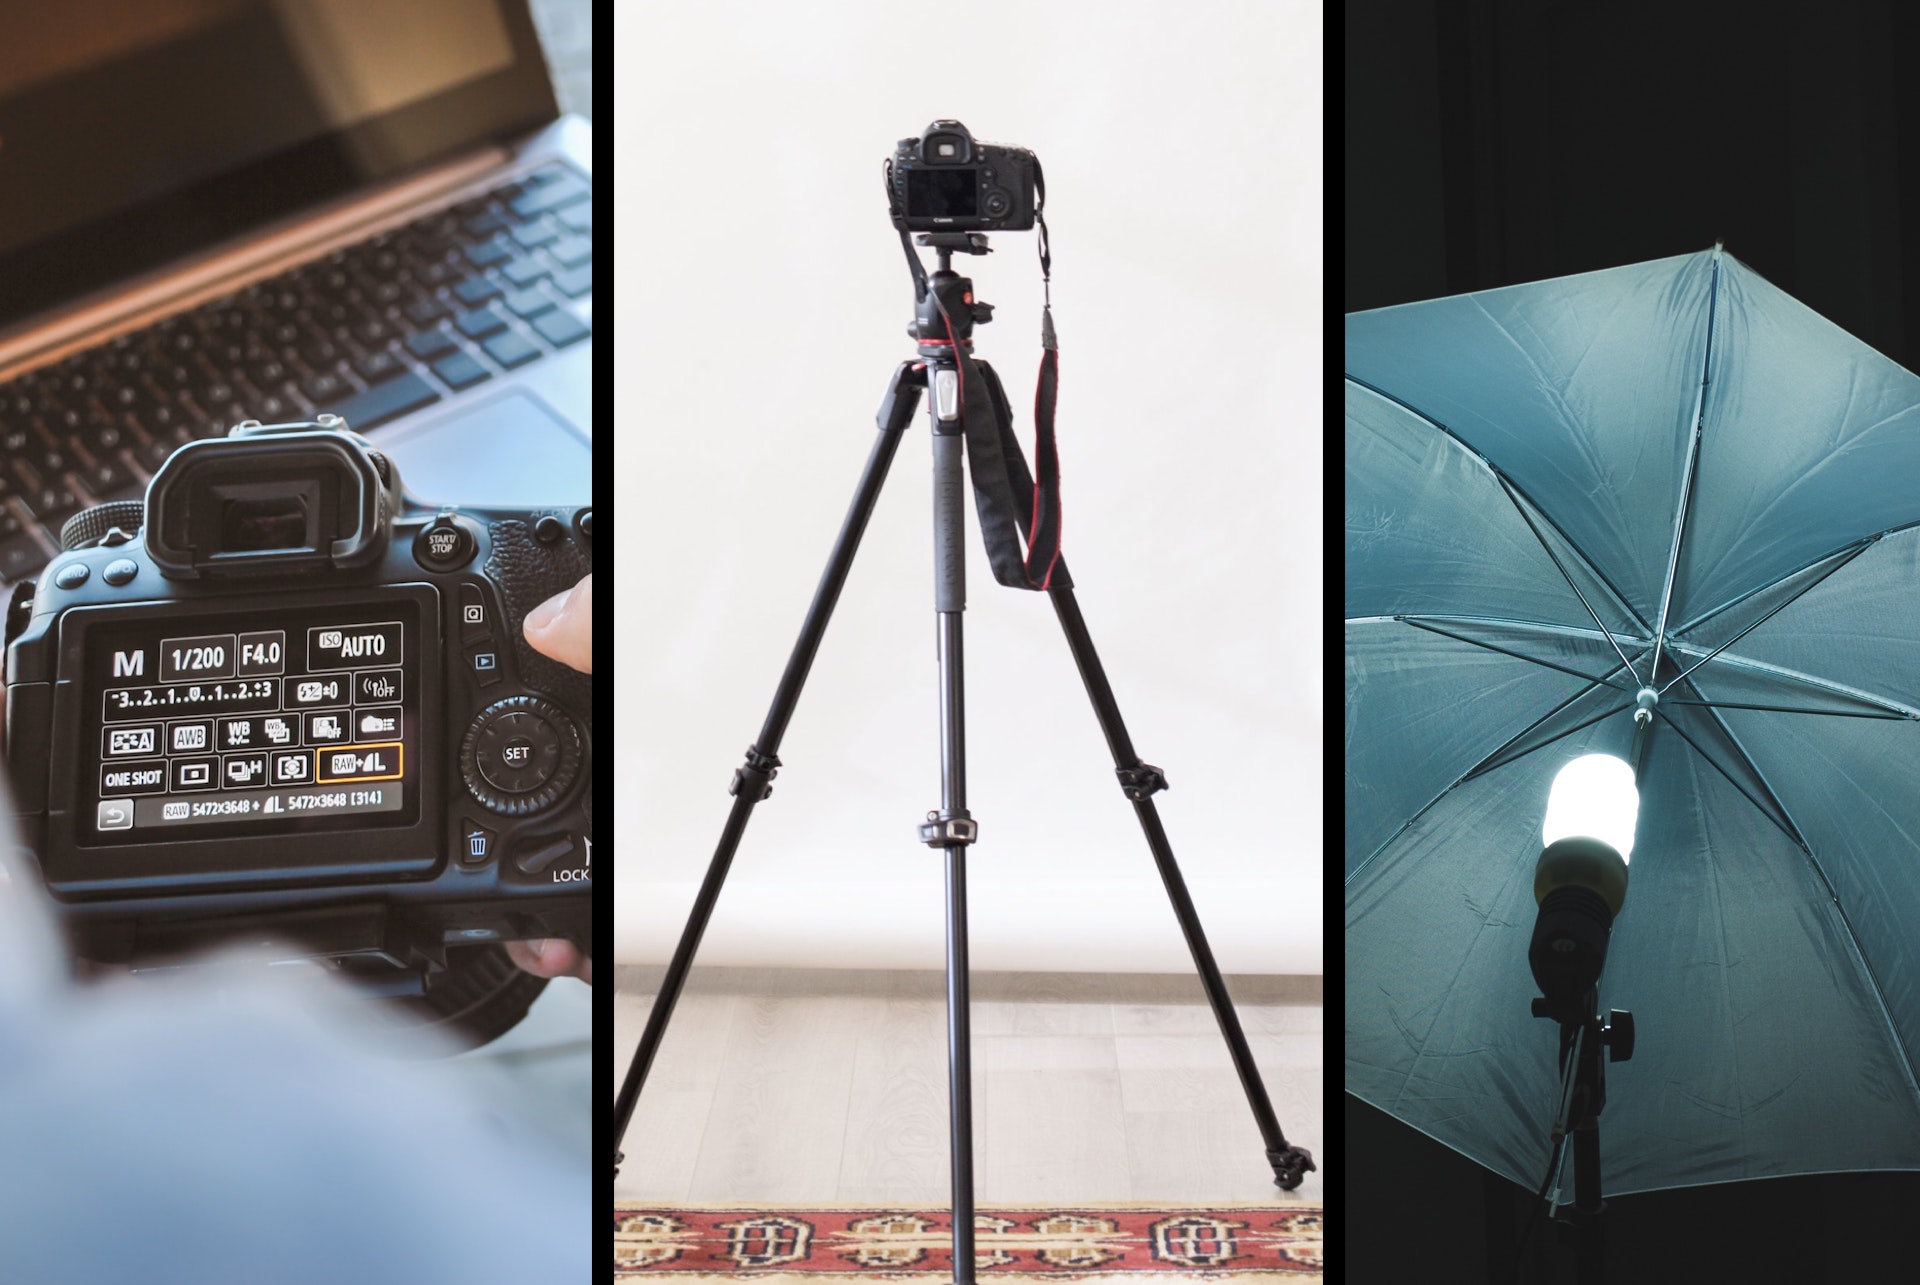
1. What You'll Need
Lighting
The most important aspect to begin with is the lighting.
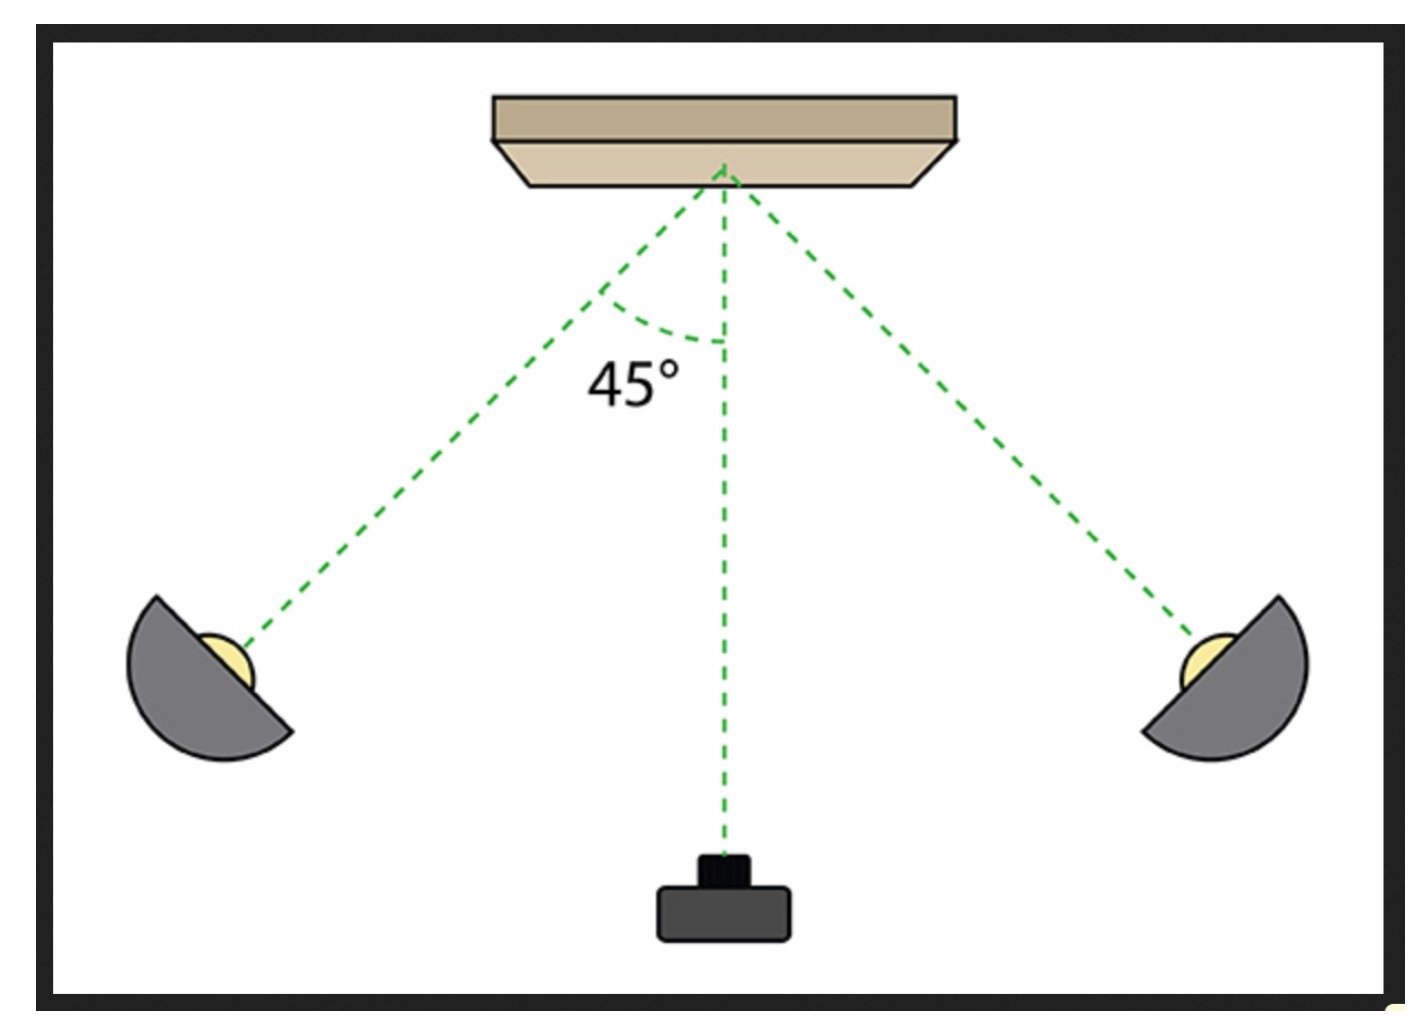
In professional terms, this is called 'copy lighting' or 'copy light', and basically means using two lights on opposite sides of the artwork, each at a 45 degree angle, to provide even lighting and eliminate shadows.
I suggest a softer light with a broader spread, so I often use umbrellas to soften the light. A hard light, like a bare bulb, spotlight, or direct sunlight, is the least desirable for this kind of work, unless you are going for a very specific, textured look.
A basic lighting set up consists of two lights, two light stands, and two umbrellas.
A good, inexpensive example of this would be a two light Lowel Tota light kit. Each light is 750W, so relatively powerful and bright enough with an umbrella to give an even light over a larger space. Here they are, as a brand new kit from B&H Photo:
These lights are often readily available and less expensive on Amazon or eBay. On these pages, you can see current offers:
Tripod
The second essential item to have is a tripod.
No matter what camera you use, even an iPhone or other camera/phone, a tripod is essential to provide sharp images. Plus, it is much easier to get your camera in the right spot, square, level, and straight on, when you use a tripod.
There are a million tripods available in almost all price ranges, it is a little bit of 'you get what you pay for', but look for one that goes up to at least 60".
B&H photo has a selection of inexpensive and higher quality options.
When using a phone, you'll need an adaptor.
Camera
You can get great results using an iPhone or better camera phone, but it must be said that I don't think the images are of high enough quality to use as master images for prints for sale.
If you are going to want to shoot high quality images of your artwork for reproduction as prints, I would strongly suggest you get a better camera to use.
But, with a little work, a high quality camera phone image can be used for all your social media, online advertising, and website images, and reproduction of small sizes only, maybe up to 8x10, or coasters, etc. (Yes, there are photographers using iPhone images and making huge prints, but I am pretty sure they are spending a lot of time in Photoshop with image manipulation, re-sizing, and post production to get them to work.)
I strongly suggest using a DSLR camera of at least 24MP, and a good lens, if you want to shoot your original artwork, and use these images for reproduction as prints.
There are many available, but one I like a lot is the Sony A6000. It is a 24MP, mirrorless camera with a lot of great features, and although it is not the most recent model, it will do 95% of what the newer ones do, at a better price.
The kit zoom lens that comes with the camera is pretty good, but if you want super high quality I might suggest also getting a fixed lens. Here is a 30mm option and a 50mm.
These are super sharp lenses, and when used with the A6000 or better, will give excellent results. Check on eBay also for used versions.
Other Equipment
The last thing I would suggest is a neutral grey card. If you have one of these in the frame of your image, not necessarily on the artwork but off to the edge, it is very easy to use this in Photoshop to balance the color of your lights so they are neutral.
This is a slightly advanced technique, but super useful and highly recommended.
With a grey card in the frame, and a couple of easy adjustments, you can insure that the lighting is neutral color, and the colors of the artwork will photograph accurately.
2. Capturing Your Photo

Okay, so you've got your lights, your camera, a tripod to stabilize the shot, and a grey card to ensure you end up with perfect color. Let's take some photos! Here's how:
Set up your artwork on a neutral colored wall, with as much room as possible on either side of the artwork for your lights. Try to hang it at ~48" high so as to avoid any color casts from the floor or ceiling.
Set up each light at a 45 degree angle from the artwork, approximately 6' away from the artwork to give a broad and even spread of light.
To test this, you can use apps like "My Lightmeter Pro" to take readings at the four corners of the artwork as well as the center. All five readings should be the same or very close, and you can transpose this info into the manual settings on your camera if using a DSLR (step IV).
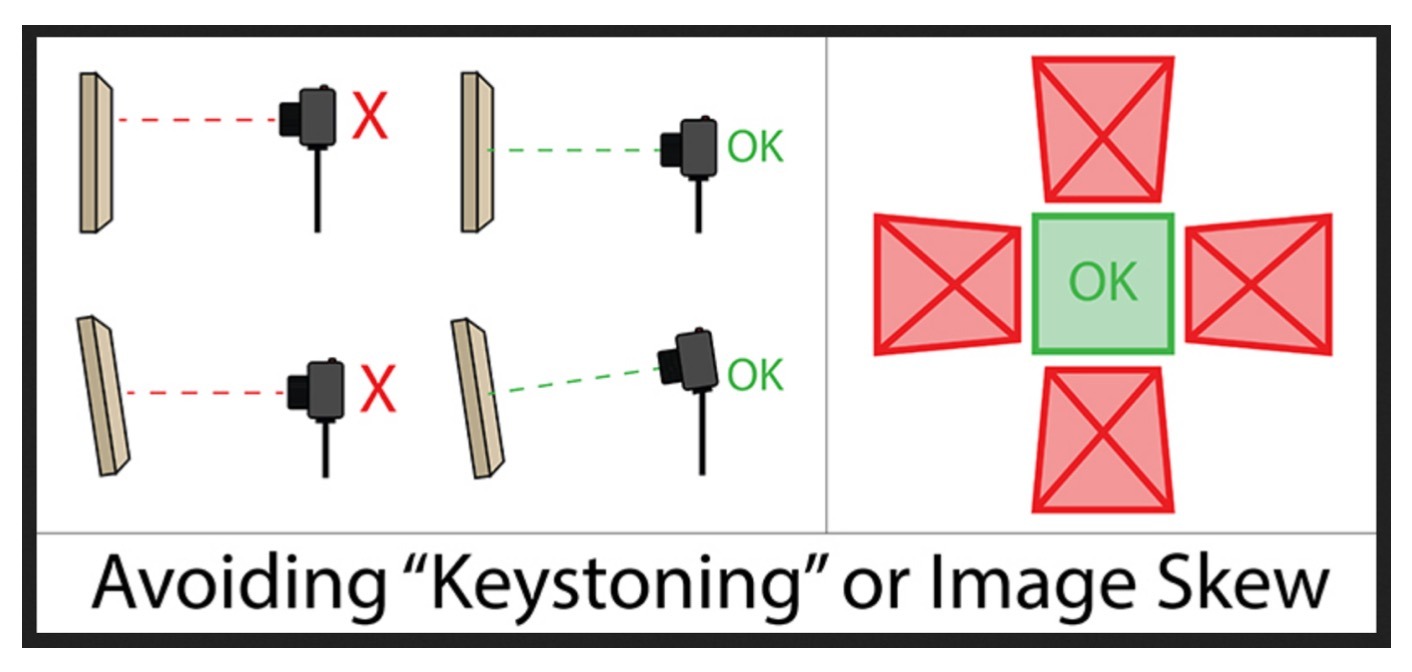
Set up your tripod directly across from the artwork. You want your camera to be at the same height, and exactly parallel to the artwork to avoid distortion.
Frame up the work with your camera. With the lights on, move your tripod with camera attached until you fill almost the entire frame with the art.
If using a phone:
Move back a little bit and zoom in. Most normal settings for a camera phone provide you with a wide angle lens, which has a tendency to distort the edges of flat artwork. If you zoom a bit, this starts to move you to a more telephoto lens which will take away the distortion. Alternatively, if you have an iPhone 11 Pro, you can start by using the telephoto lens setting.
If using a DSLR:
For zoom lenses, go to a telephoto setting between 50 and 100mm. With fixed lens, just move the tripod until you fill the frame with the work.
I suggest setting your DSLR to manual mode with these settings:
- ISO: 200
- Aperture: f/8 or f/11
- Shutter Speed: Adjust until you get correct exposure (per the camera's screen).
- File Type: JPG HIGH + RAW
- White Balance: Tungsten if using continuous tungsten lights such as the Lowel Totas mentioned above (usually indicated in the menu with a little lightbulb icon). Otherwise, Auto (mostly) works.
- Color Space: Adobe RGB to capture as much color as possible. You can always convert to sRGB later if you need to.
Capture a test image with these settings and examine it closely to see if it looks right. Maybe also shoot a frame that looks a little light on the back of the camera, and another that looks a little dark, giving you a bracket of exposures to adjust later.
Capture the grey card. If there's a little room on one edge of your frame, add the grey card there. It's OK if you don't see all of it, just a piece of neutral grey in the frame will allow you to color correct later.
If there's nowhere to use it on the edge, then capture a shot of you holding the grey card right in front of the artwork. Then, remove the grey card for the subsequent steps. You can use the shot of it to balance the color on the shots without the card. Repeat for each new work you capture.
Take the photo - finally! Use the self-timer feature on your camera to avoid any camera shake while the photo is taken, and go for it! Take several images, it's always better to have more than one.
Process your images.
If using a phone:
Your images may need some slight adjustments. There is a lot of computational photography going on behind the scenes with an iPhone, and not all of it is helpful if you are trying to get a really accurate color reproduction.
I will often adjust brightness and color of my iPhone images, and one great app for that is Snapseed. So, once I have an acceptable image direct from the camera, I will then open it in Snapseed to do all my final adjustments. I create a specific album in Photos called 'ASF' to put all these images in to for quicker access.
If using a DSLR:
Import the high res images into Lightroom or Photoshop for final clean-up and optimization.
In Photoshop, for example, you can straighten edges using the image/distort tool, crop using the crop tool, clean up dust using the clone or spot healing brush tool, and color balance using the eyedropper tool and selecting your gray card as mid-tone gray in color balance.
You can also optimize to taste for exposure, contrast, sharpness, clarity, vibrance, and saturation. And finally add your signature to the image, if you so desire.
I might also use an external bit of software to resize the images, so I can offer very large print sizes. One example is ON 1 Resize – if you are starting with a high quality 24MP images, it can enlarge them for you by an incredible amount, with no loss of quality. A full 24MP image is 4000 x 6000 pixels. I use software to enlarge all my images to a long side of 9000 pixels to offer large sized prints.
Back-up your images
Whether you used a phone or a DSLR, you will want to save these images in multiple places to protect the work you put into capturing them.
I usually make a folder of Master Images, and save it on multiple hard drives, as well as in the cloud. I use this as my folder of images to upload to my warehouse at Art Storefronts for print reproduction.
3. Advanced Tips

A polarizing filter over the lens will help with glare from highlights on paint, varnish, etc.
If possible, have a large dark background or black seamless paper behind the camera to ensure nothing is reflecting in to the front of the artwork. Alternatively, make sure to be working in a darkened room, with only the copy lights on.
It is preferable to not have glass in front of the artwork, to avoid reflections. If it is unavoidable, use a polarizing filter on the lens, black behind the camera, and a more oblique angle for the copy lights to avoid seeing them in the glass.
You can also switch your lighting to use flash instead of tungsten lights. The continuous light sources like the Lowel Tota lights get HOT and the bulbs do change color slightly over time. Also, they are a bit more fragile, and the bulbs will eventually need replacement. The advantage to using flash, is the light is cool (not hot) and color balanced to daylight.
Generally flashes are more powerful than tungsten lights, and the bulbs last longer and don't change over time. So, if you a re planning on doing a lot of this, I might invest in flash equipment (like this two light set) instead of Tota lights.
All I have is an iPhone, and I don't want to invest in lights. Although I don't recommend it, as there are too many variables involved, you can shoot decent images of your artwork outside using just your phone.
Avoid direct sunlight - an overcast day is ideal. Tape a white sheet to a wall and let it fall all the way down to the ground so that it covers up some of the ground, too. This will make for a great background and prevent either the wall or ground from casting any color onto the artwork.
Then, follow the same steps as above.
My artwork is 3D. Sculpture, ceramics, jewelry, etc. requires more than just copy lighting to look good. Photographing 3-D artwork is a speciality in itself. Unless you are familiar with advanced lighting techniques for still life, I would strongly suggest hiring a professional photographer with experience photographing your type of artwork.
4. More Resources
If you are going to be photographing 2D artwork for the first time, I'd recommend supplementing this guide with a video or two to get a good feel for the overall process.
This video on YouTube shows a simplified process for shooting your artwork with a smart phone and natural lighting:
And here's another that shows the process using a DSLR:
WRITTEN BY ART STOREFRONTS MEMBER TED MORRISON
Ted is an internationally published, award winning photographer based in New York City.
You can view his website here.
Popular Posts
- The 7 Cornerstone Features Your Website Needs to Sell Art Online
- How Artist Megh Knappenberger sold $200,000+ in her first year
- A New Standard in Fine Art Print Fulfillment (Print-On-Demand)
- The Journey: Learning How to Sell Art Online
- Introducing Live Wall Preview with Augmented Reality Feature
- "A New Type of Company": The Letter Our Owner Sends to New Customers on Day One
- Art Storefronts Is Not a Marketplace, We're Something Better
Art Storefronts Is the All-In-One Art Business Solution
We help photographers and artists open and run their own art gallery business, online.
Your Own Website
Best-in-class software built from the ground up specifically for photographers and artists.
Back Office Tools
Spend less time on paperwork, and more time creating.
A Marketing Plan
Skip the frustration – we'll teach you what's actually working for photographers and artists.
What Our Customers Are Saying
Sell More Art With Augmented Reality
An augmented reality tool purpose-built for artists and photographers. You'll sell more art than ever when your buyers can see what your work will look like on their walls – straight from your website (no app downloads required!).
Get Art Marketing Advice Sent to Your Inbox
Enter you email address below and we'll keep you up-to-date on all the latest and greatest art marketing strategies and tactics.
